Cyclone Qs / Qs Pro
Setup Instructions for Cyclone Qs / Qs Pro With Drives
WARNING
If you are planning to set up multiple Cyclones, please make sure to only set up one at a time, and make sure the Cyclones that have completed setup are on while a new one is being set up. This will prevent any hostname conflicts on your network.
Before you Begin, please make sure you have:
A Cardano wallet (mobile wallet or desktop browser wallet) with at least 15 ADA and at least enough IAG tokens to stake the minimum requirement to your node (about $500 USD worth of IAG tokens per 1 TB of storage commitment).
An internet connection with at least 20mbps upload and download speed.
The ability to connect an ethernet cable to your internet router.
Operating System and Node Setup
Step 1 - Plug in your Cyclone
Plug the ethernet cable into the back of the Cyclone and connect it to your internet router
Plug the power cable into the back of the Cyclone
Step 2 - Power on your Cyclone
Press the power button on the front
Step 3 - Install the Cyclone operating system
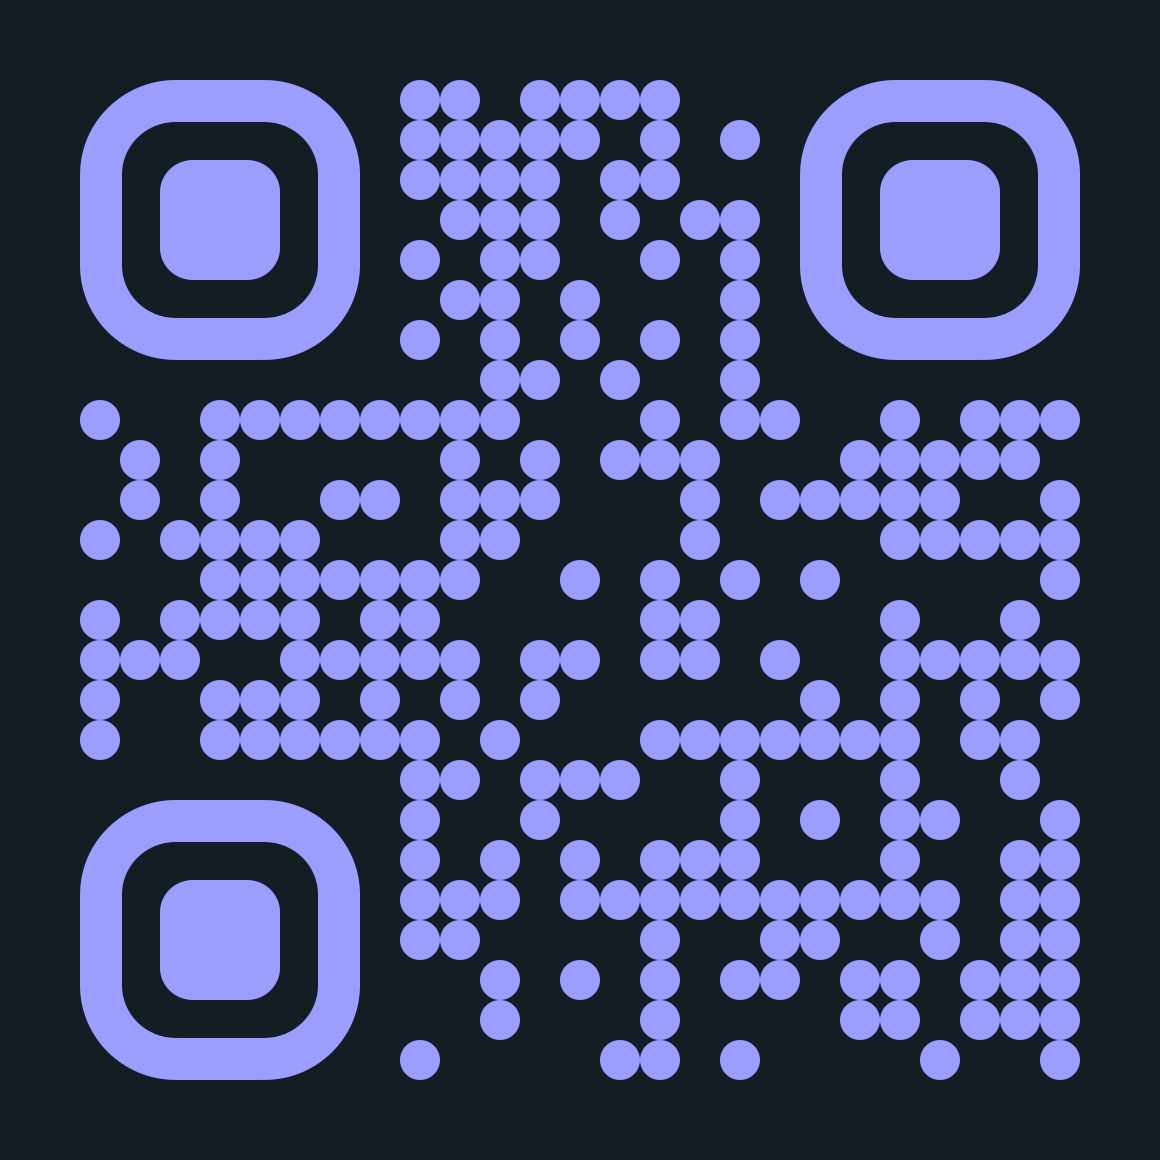
Scan the QR code or visit the following web page to begin the device setup process. We recommend doing setup on the same device you use for your Cardano wallet, to avoid having to switch between devices later on. The first two steps will format your boot drive(s) and install the Cyclone operating system. This process relies on the bootable MicroSD card that is pre-installed in the back of the Cyclone - do not remove it.
http://cycloneos-installer.local

Quick Setup will automatically set up your Cyclone in the recommended and safest configuration for the hardware you have installed
Advanced Setup will allow you to choose your setup configuration (only recommended if you know what you’re doing)
You will be prompted to reboot your Cyclone once the operating system is installed, the Cyclone will reboot into the Cyclone operating system
TIP
If your network doesn't support mDNS (hostname broadcasting) and you also can't find the ip address of your Cyclone, you may plug a monitor into the DisplayPort or HDMI port use the USB ports to connect a keyboard and mouse to interact with your Cyclone.
Step 4 - Node setup
You should be automatically redirected to the Cyclone OS url after the device reboots, but if not, simply scan the QR code or visit the following web page in your web browser to begin the node setup process.
You may bookmark this URL, as it is how you will interact with your Cyclone in the future.
Please ensure that all of your Cyclones are running as you set up a new one, so that a unique hostname is not duplicated. It is recommended to physically distinguish each Cyclone (with a piece of tape or a sticker) by the order they were set up in.
Quick Setup will automatically set up your node in the recommended and safest configuration for the hardware you have installed
You may use the default port number unless you already have an Iagon node running on that port number, in which case please change it so that it is unique
A default storage path of
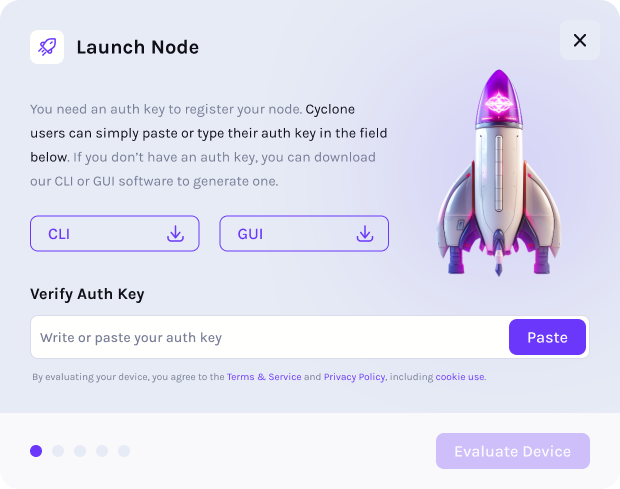
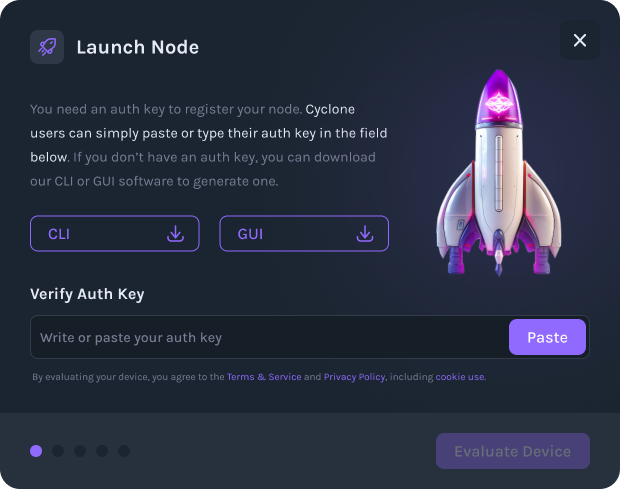
/mnt/iagon-storagewill be assigned for the node to store dataImportant: Copy or write down the auth key displayed at the end of the node setup
Step 5 - Register your node
Visit https://dashboard.iagon.com/node on your mobile Cardano wallet’s dapp browser, or your desktop web browser that has a Cardano wallet browser extension set up, and log in with your wallet
Select

Follow the on-screen prompts to input your auth key and evaluate your device
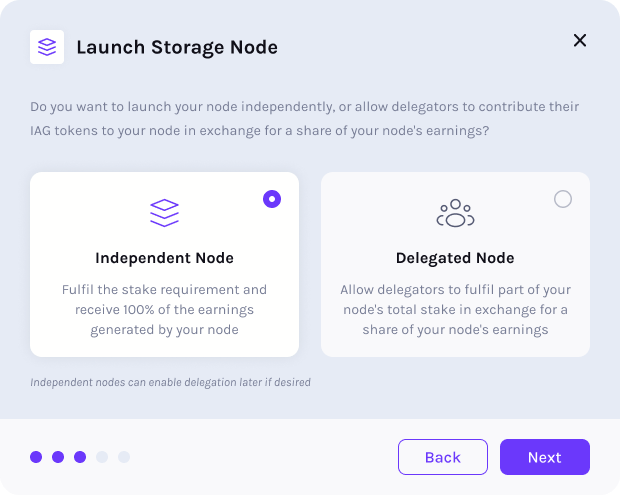
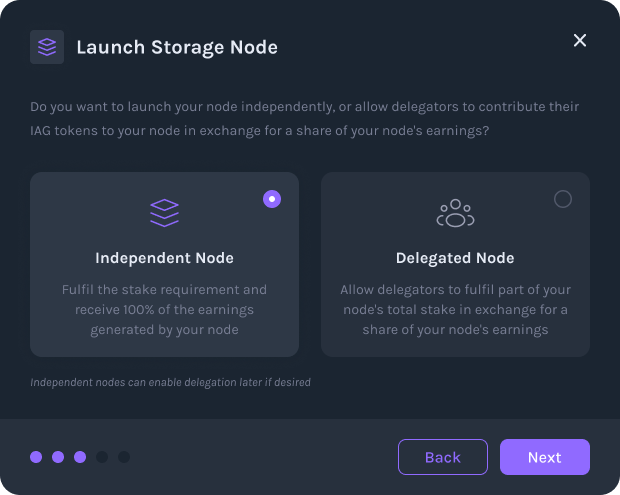
- You will need to decide if you want to run this node as an independent node or a delegated node. An independent node will be staked only by you, and you will keep all of the node’s earnings. A delegated node will be staked partially by you (at least the minimum requirement) and partially by other IAG token holders, with whom you will share the node’s earnings with. If you have any questions about these differences, please reach out to our team or refer to the Staking Platform documentation
- Continue to follow on-screen prompts to set any further node parameters and to stake your IAG tokens
TIP
You may resize your node's commitment and stake more IAG any time.